
Building a REST API with Spring Boot in Just 15 Minutes
Learn how to build a fully functional REST API in just 15 minutes using Spring Boot. Follow this step-by-step guide to create CRUD operations, manage resources, and set up endpoints efficiently. Perfect for beginners and developers!
TUTORIALJAVASPRINGBOOTREST API
12/25/20244 min read
Introduction to Spring Boot for REST APIs
Applications deployed on the web interact with each other by passing messages - one application requests the other and receives a response. There are some common rules or protocols that are to be followed.
Representational State Transfer or REST is one such architecture. It acts like the spinal chord of modern applications on web.
Now lets see if Java allows us to implement REST API. Yes Java provides us with some unique frameworks that is aiding us to create Rest Full web services.
Spring Boot is very popular in this regard. It provides us tons of libraries and utilities to create REST APIs. It also helps us to reduce unneeded lines of code, thus helping us to minimize our code-base size.
It provides us several annotations to make our lives easier. It also takes responsibility to create objects and inject to the classes where they are used.
Not only that, the Spring Boot framework also manages their lifecycle - that is Bean Life cycle management. Beans are nothing but objects.
We will see how to build a REST API using Spring Boot in a concise time frame of only 15 minutes.
What is a REST API?
A REST (Representational State Transfer) API is a web service. Its based on the rules and regulations of REST architecture.
Here standard HTTP methods are used - like GET, POST, PUT, and DELETE to perform operations on resources, which are typically represented in -
JSON or XML format. These APIS are scalable, stateless and easier to use. That makes them a popular choice for modern web applications.
What is CRUD?
CRUD stands for Create, Read, Update, and Delete - they are the four basic tasks that can be performed on data. In the context of REST APIs:
Create: Corresponds to the HTTP POST method and is used to add new resources.
Read: Corresponds to the HTTP GET method and is used to retrieve resources.
Update: Corresponds to the HTTP PUT or PATCH method and is used to modify existing resources.
Delete: Corresponds to the HTTP DELETE method and is used to remove resources.
By implementing these operations, a REST API provides a complete interface for interacting with data.
Prerequisites
Before going into detail, first you ensure that you have the following:
Java Development Kit (JDK): Version 8 or higher.
Maven or Gradle: Build tool for managing dependencies.
An IDE: IntelliJ IDEA, Eclipse, or any code editor of your choice. Download.
Spring Boot Initializr: A tool to bootstrap your project.
Postman : An application for testing REST API. Download.
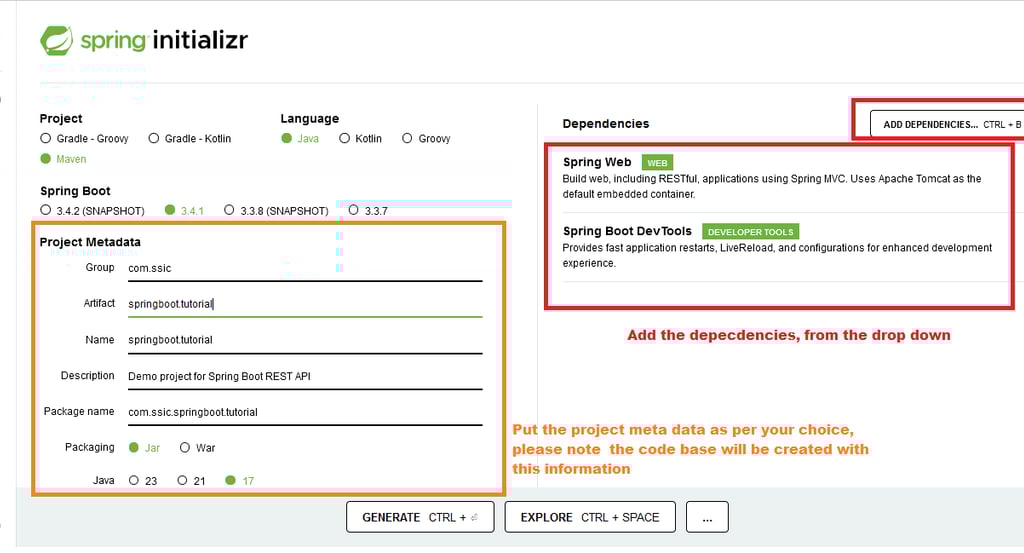
Step 1: Set Up Your Spring Boot Project
Go to Spring Initializr: Visit Spring Initializer .
Configure the Project:
Choose Maven Project.
Select Java as the language.
Choose the latest version of Spring Boot.
Add dependencies: Spring Web and Spring Boot DevTools.
Add the project meta data: Group, Artifact, Name, Description, Package name
Generate the Project: Click on "Generate" to download a ZIP file.
Extract the Project: Unzip the file and open it in your preferred IDE.
[Click the image for full screen view]
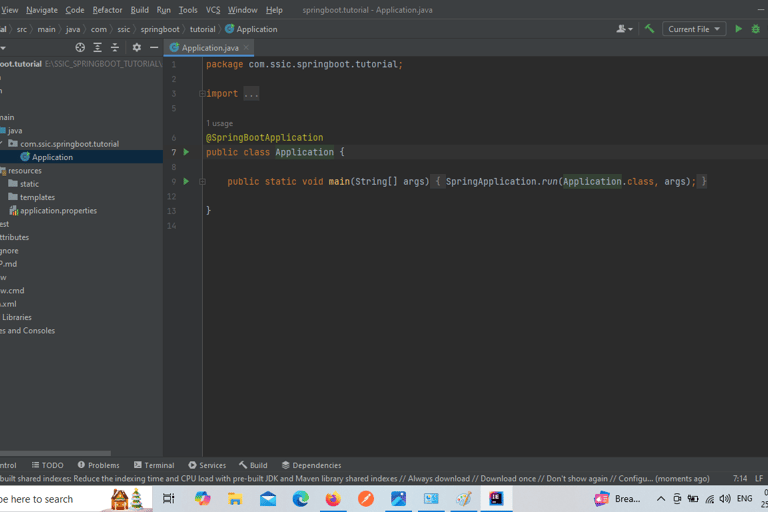
Step 2: Create a Model Class
The model represents what kind of data you will store that is the data structure of your application.Let's create a simple User model.
Create a folder model, (its a best practice to create individual folders for each purpose)
create a class User. Refer the code below.
Download Intellij IDEA community Edition - [ a standard editor for back end development]
Your repository after extracting will look like this:
Step 3: Create a Repository Class
In a real world case, you’d use a database. For making it simple, we’ll use a mock repository to store data in memory. Create a folder repository and a class UserRepository.
Why do we need a repository?
Repositories are actually interfaces. It specifies the underlying database interactions, providing a clean and consistent way to perform CRUD (Create, Read, Update, Delete) operations and queries. Read more.
But here we are writing a mock one - that will mimic the repository behavior.
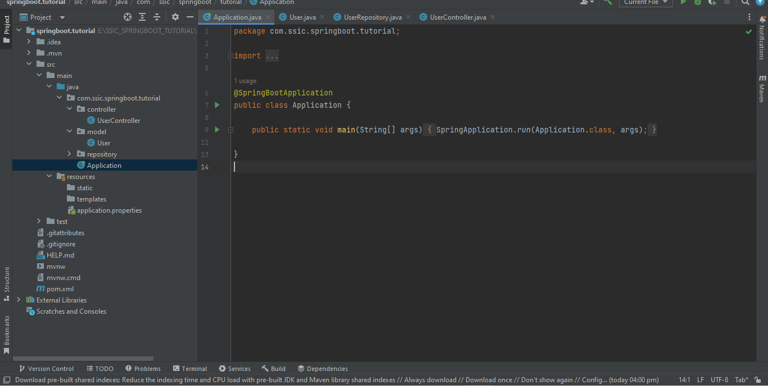
Step 4: Create a Controller Class
The controller is a module that handles HTTP requests and maps them to appropriate methods.
Let’s create a folder controller and a class inside it - UserController class to manage User resources.
Step 5: Run the Application
Navigate to the Application class in your project, which should look like this:
Run the application using your IDE’s run button or the command line:
mvn spring-boot:run
Also read : Top 10 Spring Boot Features Every Developer Should Know
Step 6: Test Your API
You can test your API endpoints using tools like Postman, cURL, or your browser.
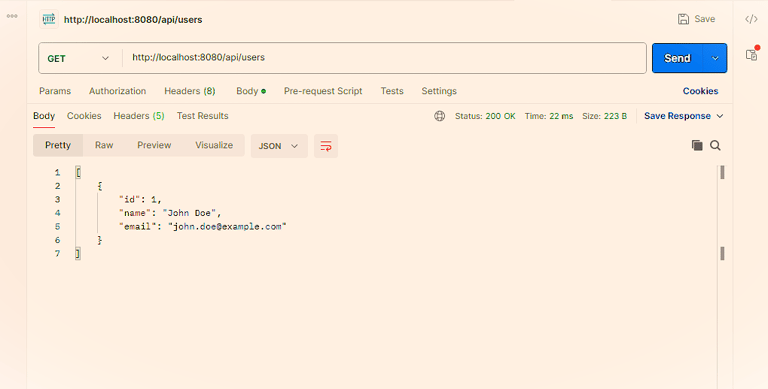
GET /api/users: Retrieve all users.

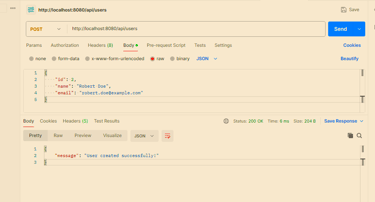
POST /api/users: Create a new user. Example payload:

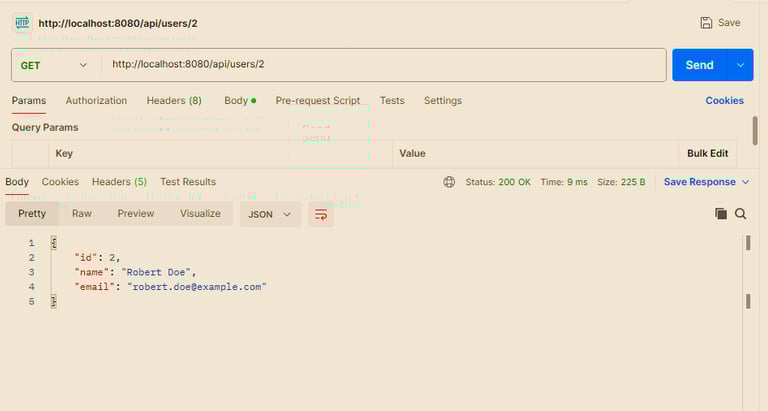
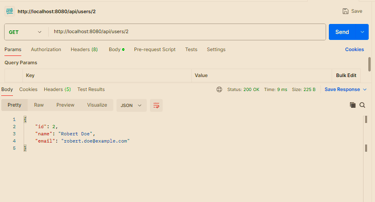
GET /api/users/{id}: Retrieve a user by ID.
Watch this tutorial video to find out how the code works and how to test in Postman.
Refer this code on Github : Springboot Tutorial
Related Articles:
Top 10 Spring Boot Features Every Developer Should Know
A Detailed Beginner’s Guide to Building Web Apps with Spring Boot
Conclusion
Building a REST API with Spring Boot is both quick and efficient. In just 15 minutes, you’ve created a fully functional API with endpoints for creating and retrieving user data.
As you grow more familiar with Spring Boot, you can expand this foundation to include features like database integration, authentication, and error handling.
Spring Boot's simplicity and power make it an excellent choice for modern web development. Start building your APIs today and unlock new possibilities for your projects!
Recent Stories
Subscribe to our newsletter
Enjoy exclusive special deals available only to our subscribers.